

ReeLapse is the leading iOS app for creating professional-grade time-lapse and hyperlapse videos. It offers powerful features that transform your device into an advanced time-lapse camera. Explore extensive manual controls, customizable intervals, and up to 6000 frames per session to capture time as you see fit.
In this tutorial page you’ll learn how to best use each feature which ReeLapse has to offer, so that you can take the best out of it and get shooting.
REELAPSE - GETTING STARTED
REELAPSE - INCEDIBLE HYPERLAPSE WITH MOTION BLUR
REELAPSE LONDON'S ADVENTURES WITH MARK MCGEE
GET STARTED
MANUAL vs AUTO CONTROLS
Go MANUAL - Press on any of the labels (ISO, SS, MF, WB). Use the scroller indicator for selecting the right value.
Go back to AUTO - Double tap on the viewfinder to reset your settings to automatic mode.
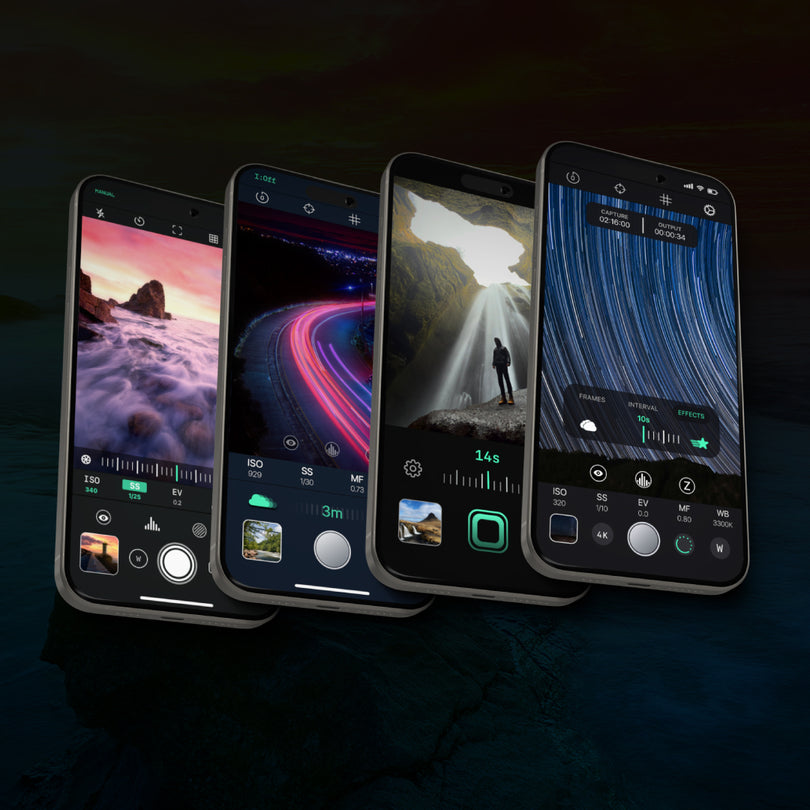
TIMELAPSE DASHBOARD
The time-lapse dashboard allows you to select 3 different sections:
- Frames: indicates how many frames you want to capture within each given interval (from 30 frames and above).
- Interval: indicates how many seconds you want to lapse before every interval, meaning between every time the app is taking a photo (from 0.5 seconds up to 60 seconds).
- Effects: If turned ON, this allows you to select which Long Exposure effect you want to be incorporated in the photo, and the duration in seconds indicates how many seconds of long exposure effect you want each photo to incorporate in it.

MOTION BLUR and LIGHT TRAILS MODES
The app incorporates a Slow Shutter mode (for long exposure), which can be turned ON and OFF in the "Effects" section. Use Motion Blur mode (Cloud Icon) to capture moving objects - give moving water a smooth silky appearance, or make moving crowds disappear.

Use Light Trails mode (Star Icon) to capture light - frame the movement of the night sky for stunning star trails.

MANUAL CONTROLS
ISO - Use a low ISO value for daylight shooting. Ramp up your ISO values in low light conditions. Be careful, high ISO values will lead to additional noise in the image.
SS - Go to slower shutter speeds for low light scenes. Use a tripod to avoid motion blur in your pictures for low shutter speeds.
MF - Use the manual focus option when you want to highlight close subjects or focus on further away objects.
WB - Sometimes the automatic algorithm fails in choosing the correct white balance, resulting in pictures which appear too "blue" or too "yellow". Use the manual white balance correction to get colours as close as possible to what your naked eyes see.

FOCUS PEAKING - Take advantage of the focus peaking feature for nailing manual focus settings over your subject. Focus peaking works by detecting edges of highest contrast in your scene (and therefore most in focus) and highlighting them in a green color. Never miss a sharp shot anymore.

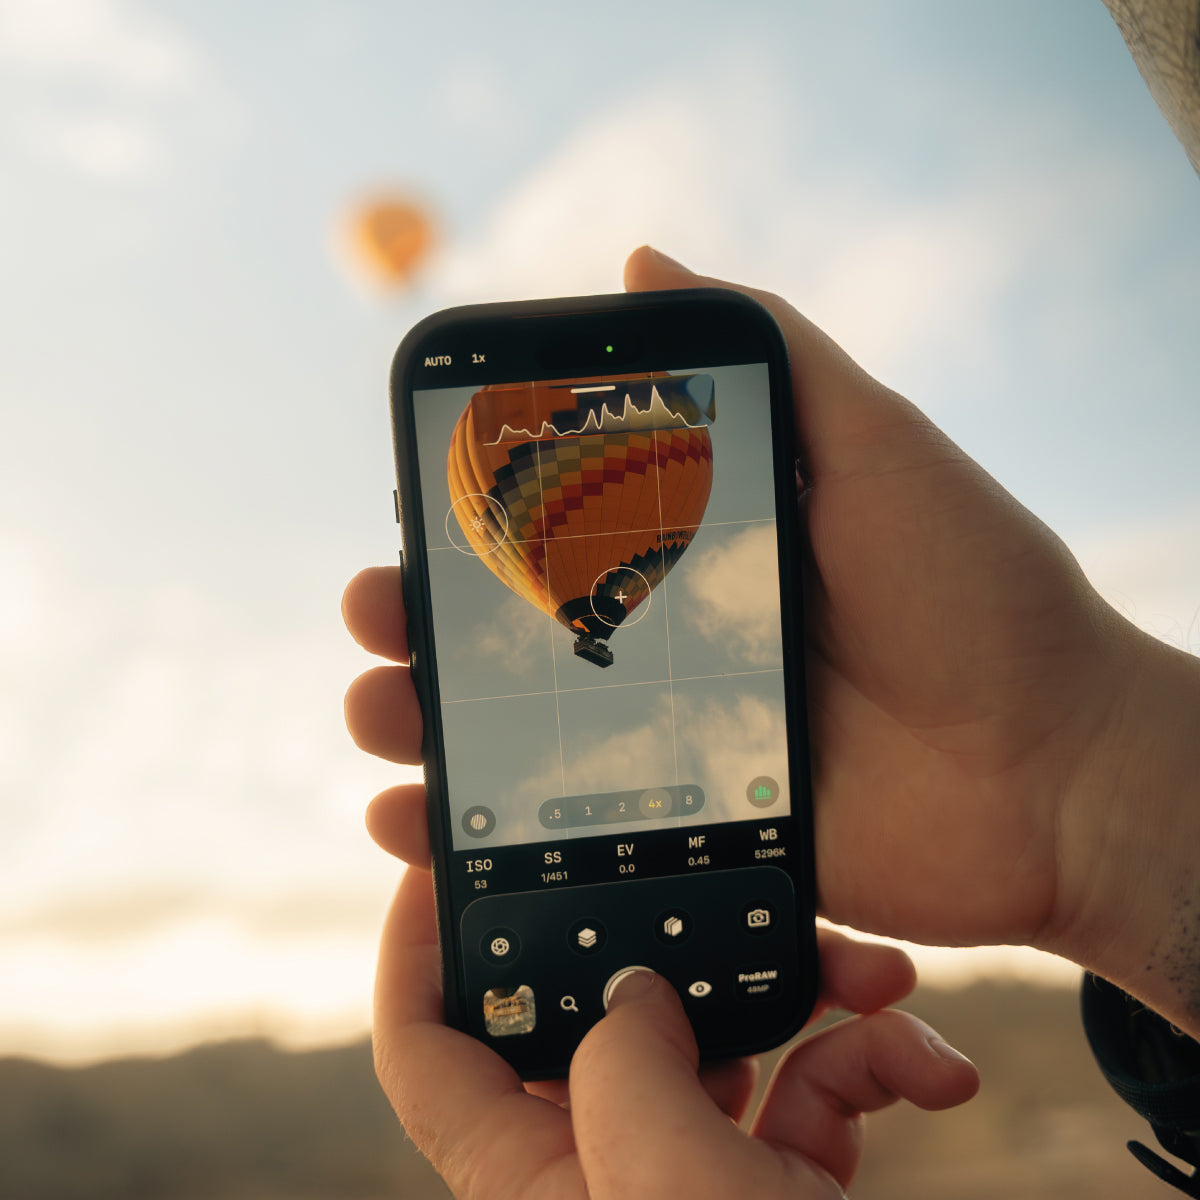
LIVE HISTOGRAMS - Available in both luma and RGB, the live histogram allows you to check the overall exposure of your image to obtain the most optimal level of brightness in your scene. The histograms will appear at the top of the viewfinder, allowing you to monitor "Shadows", "Midtones” and "Highlights". Click on the histogram to switch in between luminosity and RGB modes.

ZEBRA STRIPES - Use the zebra stripes for identifying over or under-exposed regions of your scene. Red and blue striped patterns will appear in your scene, identifying respectively over and underexposed regions. Adjusting the exposure (using Shutter Speed and ISO in manual) you will be able to see how those regions change in surface, allowing you to obtain the desired level of details.

VIDEO FORMATS
- MAX = 12MP resolution. This is 12.6 million pixels, formatted at a 4:3 ratio

- 4K = 840x2160 pixels, which is about 50% less pixels than "MAX". This is 8.3 million pixels, formatted at a 9:16 ratio.

HEADER BAR
TIMER
The extended timer allows you to set a 3-, 10-, and 20-seconds delay between pressing the shutter button and the photo being taken. This can be useful in a variety of shooting situations.
For example, if you’re using an iPhone tripod and iPhone tripod mount, you can use the timer delay so that you can appear in the photo yourself.
It’s also very helpful when shooting in dark environments with a tripod. Leaving a 10 second delay ensures that the camera will be perfectly still by the time the photo is taken.
To activate the timer, tap the Timer icon, on the top headbar, right next to the Flash icon.
GYROSCOPIC TILTMETER
The Tiltmeter is a simple graph-like method of showing how straight or level your iPhone is when taking a photo. The Tiltmeter is a fantastic tool for ensuring horizons or other lines in your photo are straight.
Tap the icon, representing an empty square, in the center of the top header, to select the Tiltmeter. You’ll now see a large cross (grey-color) appear in the middle of the screen with two overlapping horizontal lines (white-color), indicating the orientation of the iPhone. Tap again on the top-header icon to disable the Tiltmeter. As you tilt your iPhone, you’ll see the two horizontal lines (white color) move according to your iPhone movement.
When the horizontal lines align exactly with the Tiltmeter grid (grey cross), the Tiltmeter will turn green and you know that your iPhone is perfectly at level (with some minor tolerance) – so, in line with the horizon.
To turn off the Tiltmeter, tap again on the Tiltmeter icon – now representing a square with a cross in it, so that the icon shows once again the empty square.
GRIDLINES
The gridlines are the perfect tool to help you composing your photos according to the Rule of Thirds. The grid helps you line up elements in your photo to ensure horizons are level and architectural lines are straight.
To switch on the gridlines, tap the top header Crossed Squared Box icon, next to the Tiltmeter icon. Tap again on it to turn off the gridlines.

CAMERA SETTINGS EXPLAINED
ISO
In digital photography, ISO refers to the sensitivity (signal gain) of the camera’s sensor. The lower is the ISO number, the less sensitive the sensor is to the light available in the scene. The correct level of ISO can vary greatly depending on when and where you are shooting.
For example, if you are shooting in day light, you should use a low ISO value. Contrarily, for shooting indoors or in darker conditions, you should increase your ISO. Even when the overall scene allows the use of a low ISO, you might want to increase you ISO level to be able to increase your shutter speed, capturing a sharp image of a fast-moving subject.
However, in any case, keep in mind that increasing the ISO value also means increasing the noise in your image.
SHUTTER SPEED
The “shutter speed” refers to the amount of time that the image sensor keeps capturing light from the scene. In the Reeflex camera app, the shutter speed is indicated as a fraction. The lower the denominator, the longer the sensor allows light in. A slower shutter speed is indicated to capture images in low light conditions. However, if the phone is not perfectly still, a slow shutter speed will result in a blurred image. Therefore, we recommend using a tripod for slow shutter speed.
You can use slow shutter speeds to intentionally achieve blur in your image. Increase your shutter speed when you want to freeze a fast-moving subject in your scene.
MANUAL FOCUS
Attaining a relatively sharp image first comes with proper focal range. Most DSLR shooters capture with autofocus because it’s simple, effective, and reliable. However, having the option to manually focus on a particular subject, or part of a subject, is crucial to finalizing the perfect picture. Manual focus especially comes in handy when the camera can’t quite fix on what part of the frame you need.
The focus slider allows you to manually focus by sliding focal point from near to far. This comes particularly useful when shooting portraits or other subjects in the foreground.
WHITE BALANCE
The main goal of white balance is to include the same colors and tones seen by the naked eyes into your digital photos. Most current devices have automatic white balance settings. However, in tricky light conditions, the algorithm gets tricked and your pictures result too “bluish” or “yellowish”. Reeflex camera app allows you to accurately change the temperature of the colors present in your image, to take your pictures to the next level.